两台汇聚层的框式交换机通过VRRP和STP实现网关备份。为了简化配置,要将两台框式交换机合并为逻辑上的一个集群系统。
如图1-1所示,汇聚层的S1和S2是两台单框设备,现将S1和S2合并为集群系统,从而简化配置,方便维护和管理。
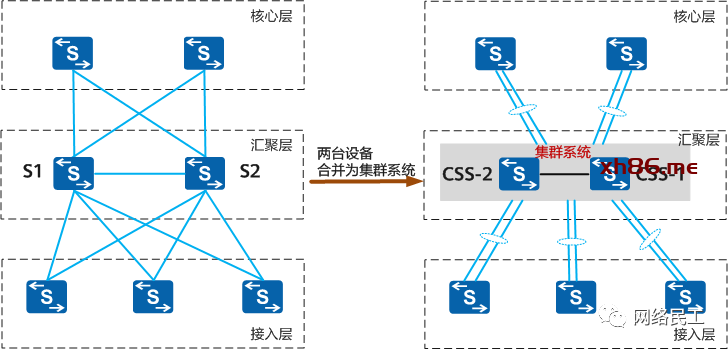
图1-1 单框设备合并为集群系统组网图
两台单框设备合并为集群系统时,主要配置变更点有:
- 汇聚层部署的VRRP网关备份协议不再需要,配置删除。
- 接入层部署的STP破环协议不再需要,配置删除。
- 接入层、汇聚层和核心层的链路变更为Eth-Trunk,相关接口配置需要变更,包括基本的VLAN配置、QoS和ACL配置等。
在原组网中,接入层的流量通过STP和VRRP负载分担在多条链路上,如图1所示,一部分流量通过S1转发,一部分流量通过S2转发。
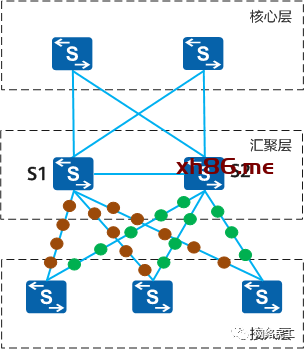
图1-2 原流量转发示意图
【1】通过命令shutdown汇聚层交换机S2的上行和下行端口来切换STP和VRRP状态,使S2从网络中隔离,所有流量通过S1转发,如图1-3所示。
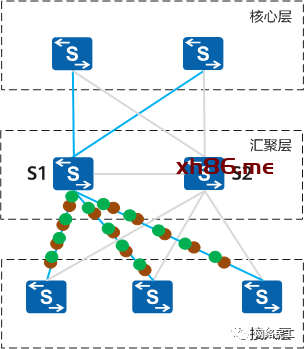
图1-3 切换后流量转发示意图
【2】备份S2的配置文件。因为单框设备使能集群功能重启后,接口编号会从三维格式变为四维格式,接口下的配置会丢失。
【3】配置S2为集群状态。
A、业务口集群的操作步骤
①把S2下电,安装业务板,然后将S2上电启动。
②配置集群连接方式及集群优先级。
<S2> system-view
[S2] set css mode lpu
[S2] set css priority 200  //配置集群优先级为200,保证在两台交换机同时启动后S2仍然被选举为主交换机
[S2] display css status saved  //查看保存的集群配置信息是否正确
Current Id   Saved Id     CSS Enable   CSS Mode    Priority    Master Force
------------------------------------------------------------------------------
1            1            Off          LPU         200         On
③将业务口配置为集群口。假设业务口XGE1/0/1、XGE1/0/2、XGE2/0/1、XGE2/0/2为集群口。
[S2] interface css-port 1
[S2-css-port1] port interface xgigabitethernet 1/0/1 to xgigabitethernet 1/0/2 enable
[S2-css-port1] quit
[S2] interface css-port 2
[S2-css-port2] port interface xgigabitethernet 2/0/1 to xgigabitethernet 2/0/2 enable
[S2-css-port2] quit
④使能集群功能。
[S2] css enable
Warning: The CSS configuration will take effect only after the system is rebooted. The next CSS mode is LPU. Reboot now? [Y/N]:y
⑤设备启动后,查看S2的集群状态。如下显示表示S2已切换为集群状态。
<S2> display device
Chassis 1 (Master Switch)
S7712's Device status:
Slot  Sub Type         Online    Power      Register       Status     Role
-------------------------------------------------------------------------------
1     -   ES0D0X12SA00 Present   PowerOn    Registered     Normal     NA
2     -   ES0D0X12SA00 Present   PowerOn    Registered     Normal     NA
13    -   ES1D2SRUE000 Present   PowerOn    Registered     Normal     Master
14    -   ES1D2SRUE000 Present   PowerOn    Registered     Normal     Slave
PWR1  -   -            Present   PowerOn    Registered     Normal     NA
PWR2  -   -            Present   PowerOn    Registered     Normal     NA
CMU1  -   EH1D200CMU00 Present   PowerOn    Registered     Normal     Master
FAN1  -   -            Present   PowerOn    Registered     Normal     NA
FAN2  -   -            Present   PowerOn    Registered     Normal     NA
FAN3  -   -            Present   PowerOn    Registered     Normal     NA
FAN4  -   -            Present   PowerOn    Registered     Normal     NA
B、集群卡集群的操作步骤
①把S2下电,安装集群卡,将S2上电启动。
②配置集群优先级。
<S2> system-view
[S2] set css priority 200  //配置集群优先级为200,保证在两台交换机同时启动后S2仍然被选举为主交换机
[S2] display css status saved  //查看配置是否正确
Current Id   Saved Id     CSS Enable   CSS Mode    Priority    Master Force
------------------------------------------------------------------------------
1            1            Off          CSS card    200         On
③使能集群功能。
[S2] css enable
Warning: The CSS configuration will take effect only after the system is rebooted. The next CSS mode is CSS card. Reboot now? [Y/N]:y
④设备启动后,查看S2的集群状态。如下显示表示S2已切换为集群状态。
<S2> display device
Chassis 1 (Master Switch)
S7712's Device status:
Slot  Sub Type         Online    Power      Register       Status     Role
-------------------------------------------------------------------------------
1     -   ES0D0X12SA00 Present   PowerOn    Registered     Normal     NA
9     -   ES1D2S08SX1E Present   PowerOn    Registered     Normal     NA
12    -   ES0D0X12SA00 Present   PowerOn    Registered     Normal     NA
13    -   ES1D2SRUE000 Present   PowerOn    Registered     Normal     Master
      1   ES1D2VS04000 Present   PowerOn    Registered     Normal     NA
14    -   ES1D2SRUE000 Present   PowerOn    Registered     Normal     Slave
      1   ES1D2VS04000 Present   PowerOn    Registered     Normal     NA
PWR1  -   -            Present   PowerOn    Registered     Normal     NA
PWR2  -   -            Present   PowerOn    Registered     Normal     NA
CMU1  -   EH1D200CMU00 Present   PowerOn    Registered     Normal     Master
FAN1  -   -            Present   PowerOn    Registered     Normal     NA
FAN2  -   -            Present   PowerOn    Registered     Normal     NA
FAN3  -   -            Present   PowerOn    Registered     Normal     NA
FAN4  -   -            Present   PowerOn    Registered     Normal     NA
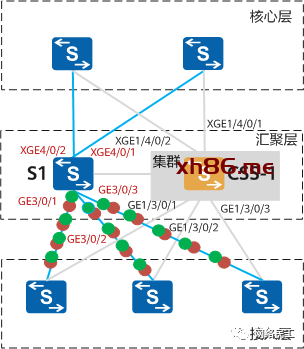
①将CSS-1的上行接口XGE1/4/0/1和XGE1/4/0/2绑定为Eth-Trunk,并把原接口下的配置移到Eth-Trunk接口下。
例如:原接口下的配置如下(上行连接核心层的接口)。
#
interface XGigabitEthernet4/0/1
 undo portswitch
 ip address 192.168.4.2 255.255.255.0
#
interface XGigabitEthernet4/0/2
 port link-type trunk
 port trunk allow-pass vlan 100 200
#
按照如下步骤修改配置。
<S2> system-view
[S2] sysname CSS
[CSS] interface eth-trunk 20
[CSS-Eth-Trunk20] trunkport xgigabitethernet1/4/0/1
[CSS-Eth-Trunk20] ip address 192.168.4.2 255.255.255.0
[CSS-Eth-Trunk20] quit
[CSS] interface eth-trunk 10
[CSS-Eth-Trunk10] trunkport xgigabitethernet1/4/0/2
[CSS-Eth-Trunk10] port link-type trunk
[CSS-Eth-Trunk10] port trunk allow-pass vlan 100 200
[CSS-Eth-Trunk10] quit
②修改核心层和接入层设备的配置,把物理接口绑定为Eth-Trunk。操作步骤和上面类似,这里不再赘述。
③将CSS-1的VLANIF接口的IP地址修改为VRRP备份组的虚拟IP地址(用户网关地址)。
例如:原VLANIF接口下的配置如下。
#
interface Vlanif100
 ip address 10.1.10.1 255.255.255.0
 vrrp vrid 1 virtual-ip 10.1.10.111
 vrrp vrid 1 priority 120
#
interface Vlanif200
 ip address 10.1.20.1 255.255.255.0
 vrrp vrid 2 virtual-ip 10.1.20.111
#
修改VLANIF接口的IP地址后,流量全部切换到CSS-1。
[CSS] interface vlanif 100
[CSS-Vlanif100] ip address 10.1.10.111 255.255.255.0
[CSS-Vlanif100] quit
[CSS] interface vlanif 200
[CSS-Vlanif200] ip address 10.1.20.111 255.255.255.0
[CSS-Vlanif200] quit
⑤修改QoS和ACL绑定的接口,将原来绑定到物理接口的配置变更为绑定到Eth-Trunk接口。
⑥修改CSS-1设备STP的优先级,使CSS-1成为所有VLAN的根交换机。
【5】通过命令undo shutdown打开CSS-1设备上的接口,验证CSS-1与接入层和核心层的二三层连通性。
【6】CSS-1与接入层、核心层的二三层转发正常后,将S1的端口shutdown,使S1从网络中隔离。
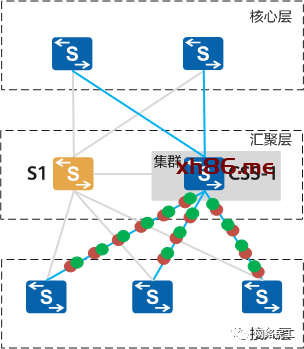
图1-5 流量切换到集群系统示意图
【7】把S1转换为集群状态。S1加入集群系统后,会使用集群系统的配置文件。
A、业务口集群的操作步骤
①把S1下电,安装业务板,连接S1与CSS-1之间的集群线缆,将S1上电启动。
②配置集群连接方式及集群ID,集群优先级使用缺省的1。
<S1> system-view
[S1] set css mode lpu
[S1] set css id 2
[S1] display css status saved  //查看配置是否正确
Current Id   Saved Id     CSS Enable   CSS Mode    Priority    Master Force
------------------------------------------------------------------------------
1            2            Off          LPU         1           On
③将业务口配置为集群口。假设业务口XGE1/0/1、XGE1/0/2、XGE2/0/1、XGE2/0/2为集群口。
[S1] interface css-port 1
[S1-css-port1] port interface xgigabitethernet 1/0/1 to xgigabitethernet 1/0/2 enable
[S1-css-port1] quit
[S1] interface css-port 2
[S1-css-port2] port interface xgigabitethernet 2/0/1 to xgigabitethernet 2/0/2 enable
[S1-css-port2] quit
④使能集群功能,重启设备。
[S1] css enable
Warning: The CSS configuration will take effect only after the system is rebooted. The next CSS mode is LPU. Reboot now? [Y/N]:y
⑤设备启动后,查看集群状态,S1已经加入集群系统。
<CSS> display device
Chassis 1 (Master Switch)
S7712's Device status:
Slot  Sub Type         Online    Power      Register       Status     Role
-------------------------------------------------------------------------------
1     -   ES0D0X12SA00 Present   PowerOn    Registered     Normal     NA
2     -   ES0D0X12SA00 Present   PowerOn    Registered     Normal     NA
13    -   ES1D2SRUE000 Present   PowerOn    Registered     Normal     Master
14    -   ES1D2SRUE000 Present   PowerOn    Registered     Normal     Slave
PWR1  -   -            Present   PowerOn    Registered     Normal     NA
PWR2  -   -            Present   PowerOn    Registered     Normal     NA
CMU1  -   EH1D200CMU00 Present   PowerOn    Registered     Normal     Master
FAN1  -   -            Present   PowerOn    Registered     Normal     NA
FAN2  -   -            Present   PowerOn    Registered     Normal     NA
FAN3  -   -            Present   PowerOn    Registered     Normal     NA
FAN4  -   -            Present   PowerOn    Registered     Normal     NA
Chassis 2 (Standby Switch)
S7712's Device status:
Slot  Sub Type         Online    Power      Register       Status     Role
-------------------------------------------------------------------------------
1     -   ES0D0X12SA00 Present   PowerOn    Registered     Normal     NA
2     -   ES0D0X12SA00 Present   PowerOn    Registered     Normal     NA
13    -   ES1D2SRUE000 Present   PowerOn    Registered     Normal     Master
14    -   ES1D2SRUE000 Present   PowerOn    Registered     Normal     Slave
PWR1  -   -            Present   PowerOn    Registered     Normal     NA
PWR2  -   -            Present   PowerOn    Registered     Normal     NA
CMU1  -   EH1D200CMU00 Present   PowerOn    Registered     Normal     Master
FAN1  -   -            Present   PowerOn    Registered     Normal     NA
FAN2  -   -            Present   PowerOn    Registered     Normal     NA
FAN3  -   -            Present   PowerOn    Registered     Normal     NA
FAN4  -   -            Present   PowerOn    Registered     Normal     NA
B、集群卡集群的操作步骤
①把S1下电,安装集群卡,连接S1与CSS-1之间的集群线缆,将S1上电启动。
②配置集群ID,集群优先级使用缺省的1。
<S1> system-view
[S1] set css id 2
③使能集群功能,重启设备。
[S1] css enable
Warning: The CSS configuration will take effect only after the system is rebooted. The next CSS mode is CSS card. Reboot now? [Y/N]:y
④设备启动后,查看集群状态,S1已经加入集群系统。
<CSS> display device
Chassis 1 (Master Switch)
S7712's Device status:
Slot  Sub Type         Online    Power      Register       Status     Role
-------------------------------------------------------------------------------
1     -   ES0D0X12SA00 Present   PowerOn    Registered     Normal     NA
9     -   ES1D2S08SX1E Present   PowerOn    Registered     Normal     NA
12    -   ES0D0X12SA00 Present   PowerOn    Registered     Normal     NA
13    -   ES1D2SRUE000 Present   PowerOn    Registered     Normal     Master
      1   ES1D2VS04000 Present   PowerOn    Registered     Normal     NA
14    -   ES1D2SRUE000 Present   PowerOn    Registered     Normal     Slave
      1   ES1D2VS04000 Present   PowerOn    Registered     Normal     NA
PWR1  -   -            Present   PowerOn    Registered     Normal     NA
PWR2  -   -            Present   PowerOn    Registered     Normal     NA
CMU1  -   EH1D200CMU00 Present   PowerOn    Registered     Normal     Master
FAN1  -   -            Present   PowerOn    Registered     Normal     NA
FAN2  -   -            Present   PowerOn    Registered     Normal     NA
FAN3  -   -            Present   PowerOn    Registered     Normal     NA
FAN4  -   -            Present   PowerOn    Registered     Normal     NA
Chassis 2 (Standby Switch)
S7712's Device status:
Slot  Sub Type         Online    Power      Register       Status     Role
-------------------------------------------------------------------------------
1     -   ES0D0X12SA00 Present   PowerOn    Registered     Normal     NA
9     -   ES1D2S08SX1E Present   PowerOn    Registered     Normal     NA
12    -   ES0D0X12SA00 Present   PowerOn    Registered     Normal     NA
13    -   ES1D2SRUE000 Present   PowerOn    Registered     Normal     Master
      1   ES1D2VS04000 Present   PowerOn    Registered     Normal     NA
14    -   ES1D2SRUE000 Present   PowerOn    Registered     Normal     Slave
      1   ES1D2VS04000 Present   PowerOn    Registered     Normal     NA
PWR1  -   -            Present   PowerOn    Registered     Normal     NA
PWR2  -   -            Present   PowerOn    Registered     Normal     NA
CMU1  -   EH1D200CMU00 Present   PowerOn    Registered     Normal     Master
FAN1  -   -            Present   PowerOn    Registered     Normal     NA
FAN2  -   -            Present   PowerOn    Registered     Normal     NA
FAN3  -   -            Present   PowerOn    Registered     Normal     NA
FAN4  -   -            Present   PowerOn    Registered     Normal     NA
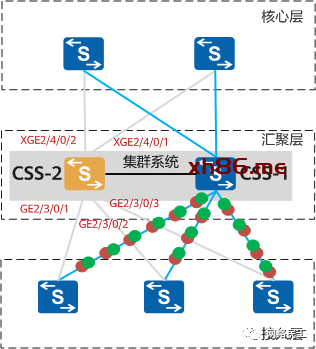
图1-6 集群合并完成示意图
【9】修改集群系统的配置,将CSS-2的接口加入Eth-Trunk。
①将CSS-2的上行接口XGE2/4/0/1和XGE2/4/0/2加入Eth-Trunk。
[CSS] interface eth-trunk 20
[CSS-Eth-Trunk20] trunkport xgigabitethernet2/4/0/1
[CSS-Eth-Trunk20] quit
[CSS] interface eth-trunk 10
[CSS-Eth-Trunk10] trunkport xgigabitethernet2/4/0/2
[CSS-Eth-Trunk10] quit
②修改核心层和接入层设备的配置,把物理接口加入Eth-Trunk。操作步骤和上面类似,这里不再赘述。
【10】通过命令undo shutdown放开CSS-2的接口,检查集群系统与核心层、接入层的二三层转发是否正常。此时两台设备合并为集群系统的操作就完成了,合并后的组网图如图1-7所示。
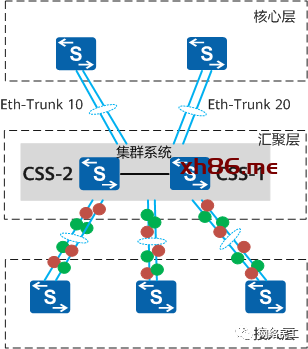
图1-7 切换后流量转发示意图
【11】删除CSS上VRRP的配置。
[CSS] interface vlanif 100
[CSS-Vlanif100] undo vrrp vrid 1
[CSS-Vlanif100] quit
[CSS] interface vlanif 200
[CSS-Vlanif200] undo vrrp vrid 2
[CSS-Vlanif200] quit